ABB's 2023 "Value of Reliability" survey found that unplanned downtime costs industrial businesses an average of $125,000 per hour — and more than two-thirds experience unplanned outages at least monthly. For facilities that depend on chillers and heat exchangers, tube sheet damage is one of the most common and most avoidable contributors to that figure.
This guide covers everything facilities managers, building owners, and engineers need to know: what tube sheets are, what damages them, how to spot problems early, what repair methods exist, and when protective coatings are the smarter investment over reactive repairs.
Key Takeaways
- Tube sheet damage is progressive — early intervention through inspection and coating is far cheaper than emergency repair or equipment replacement
- Five primary damage mechanisms drive most failures: galvanic corrosion, erosion, thermal stress, chemical attack, and joint relaxation
- Repair methods range from simple tube plugging (hours) to full retubing (days), depending on damage scope
- A properly applied 100% solids coating addresses root causes — not just symptoms — and can boost tube-to-tube sheet joint push-out strength by over 1,000 lbs
- Repair vs. replacement depends on structural integrity, plug count, and remaining service life — get a professional assessment before deciding
What Is a Tube Sheet and Why Does It Matter?
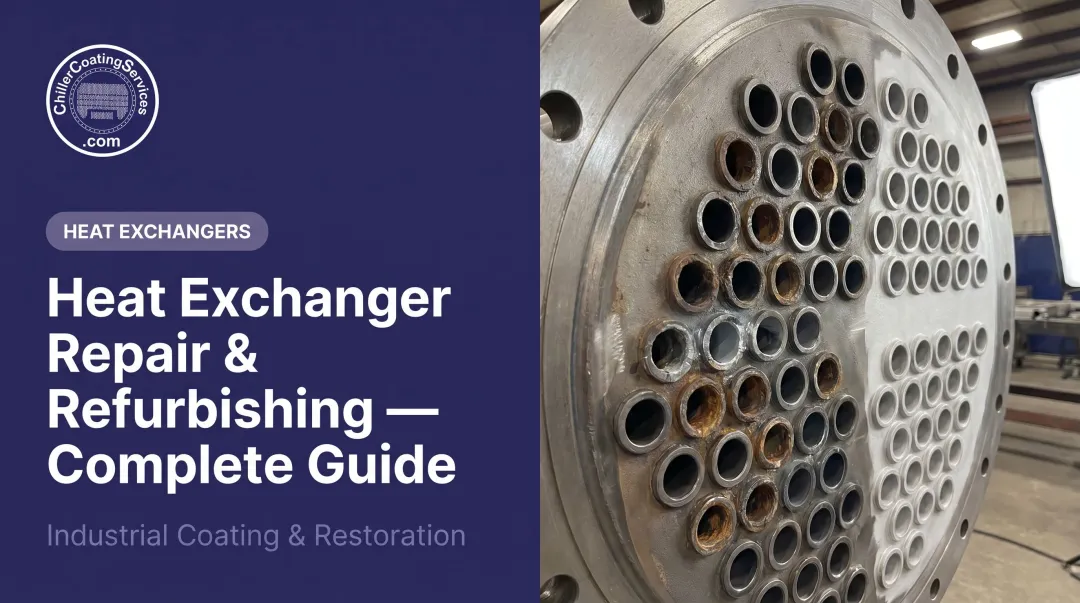
A tube sheet is the thick metal plate that anchors the tubes inside a shell-and-tube heat exchanger or chiller. It acts as the pressure boundary separating the tube-side fluid from the shell-side fluid, and its structural integrity is what keeps two different process streams from mixing.
According to ASHRAE, the shell-and-tube design is the most common heat exchanger type in industrial applications and is widely used in HVAC&R systems including water-cooled chillers. Every one of those units has at least two tube sheets, and their condition directly affects heat transfer efficiency, system pressure, and fluid purity.
Where Tube Sheets Are Found
Tube sheets appear in nearly every building that uses central cooling or process heating:
- Hospitals — where chiller reliability is a patient safety issue
- Schools and universities — with large central plants serving multiple buildings
- Office buildings and retail complexes — where HVAC downtime disrupts tenants and operations
- Power plants and manufacturing facilities — where process cooling failures have direct production consequences
In any of these settings, a corroded, cracked, or leaking tube sheet compromises the entire heat exchange process. Coolant can cross-contaminate, pressures become unstable, and efficiency drops, often before anyone identifies the cause.
Common Causes of Tube Sheet Damage
Understanding why tube sheets fail is the first step toward preventing it. Five mechanisms account for the vast majority of damage seen in the field:
- Galvanic and electrolytic corrosion from dissimilar metal contact
- Erosion and cavitation driven by high-velocity flow
- Thermal stress and fatigue cracking from repeated temperature cycling
- Chemical attack from aggressive treatment programs
- Joint relaxation and leakage as expanded tube seats loosen over time
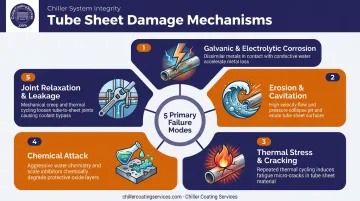
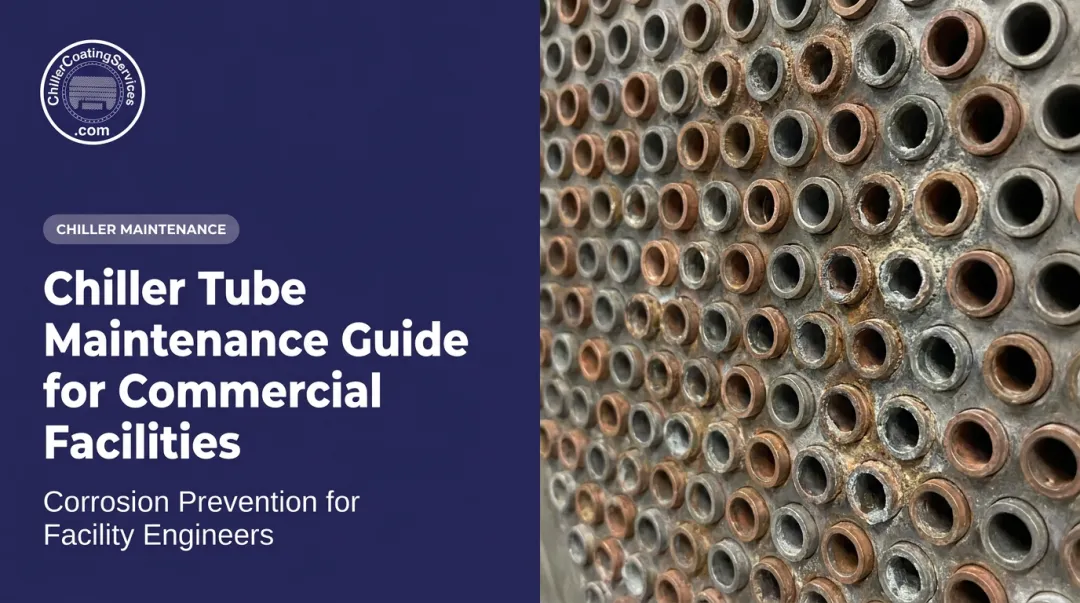
Galvanic and Electrolytic Corrosion
Galvanic corrosion tops the list for chiller systems. When dissimilar metals — say, copper alloy tubes paired with a carbon steel tube sheet — sit in contact within a fluid environment, an electrochemical reaction begins. The less noble metal becomes the anode and gradually dissolves.
The Nickel Institute's guidance on galvanic corrosion specifically flags pairings like titanium or stainless steel tubing coupled with muntz metal or aluminum bronze tube sheets as high-risk combinations due to large cathode-to-anode area ratios. Coating holidays on otherwise-protected tube sheets can accelerate this effect dramatically, concentrating corrosion at small exposed areas.
Erosion and Cavitation
Tube sheet faces wear gradually under high-velocity fluid flow, particularly at tube inlets where flow transitions create turbulence. Industry guidance suggests tube-side velocities above approximately 2.4 m/s increase erosion risk noticeably. Cavitation — localized pressure fluctuations that create and collapse vapor bubbles — adds mechanical impact damage on top of the velocity-driven wear.
Thermal Stress and Cracking
Chillers cycle through temperature changes constantly. Each cycle causes the metal to expand and contract, and over thousands of cycles, fatigue cracks develop — particularly around welded tube-to-tube sheet joints and the ligament sections between adjacent tube holes. Fixed tube sheet designs are especially vulnerable during improper startup or shutdown sequences, as noted in TEMA standards.
Chemical Attack and Joint Failure
Aggressive coolant treatment chemicals, anti-scale agents, and process fluids can deteriorate the tube sheet surface when water treatment programs aren't properly managed. Poorly balanced water chemistry is one of the more preventable causes of premature tube sheet failure.
Joint failure follows a different path. Expanded tube-to-tube sheet joints naturally relax over time, and as the mechanical interference fit loosens, leakage between tube side and shell side becomes possible — a direct performance and safety concern that typically requires re-rolling or joint re-expansion.
Warning Signs Your Tube Sheet Needs Repair
Tube sheet problems tend to announce themselves — but their symptoms often look like other system issues. Pinning down the source requires both operational awareness and a hands-on inspection.
Operational Red Flags
Watch for these performance indicators:
- Unexplained drop in cooling capacity or system efficiency
- Rising differential pressure across the heat exchanger
- Coolant loss without an obvious external leak source
- Fluid contamination — process fluid appearing in coolant, or vice versa
- Unusual noises from the chiller (cavitation sounds, pressure fluctuations)
What to Look for During Visual Inspection
A hands-on inspection of the tube sheet face should check for:
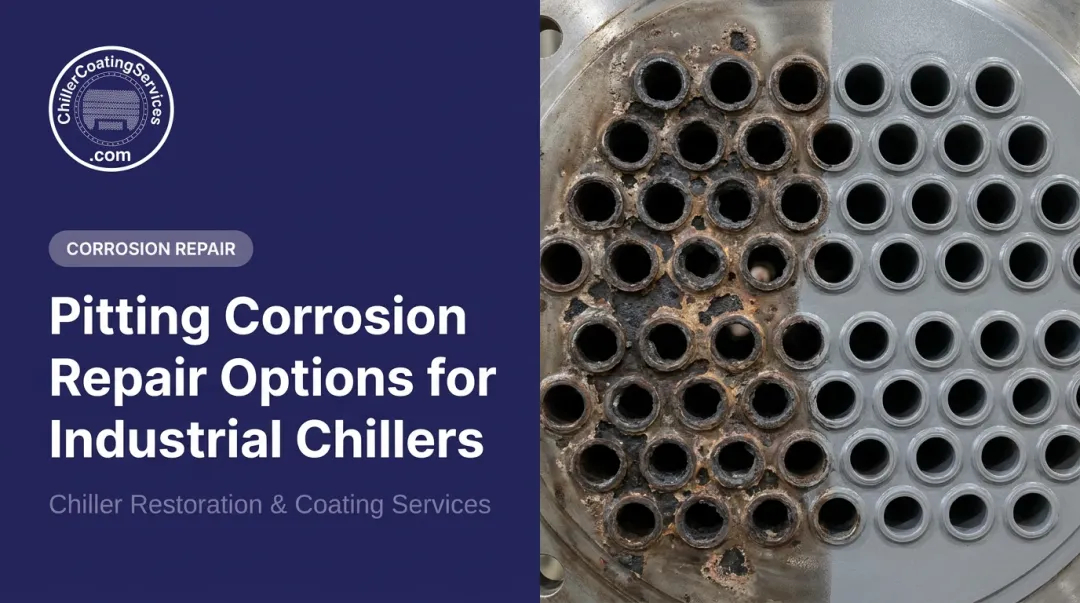
- Visible pitting or cratering in the metal surface
- Discoloration or deposits indicating corrosion buildup
- Cracks radiating from tube ends or through ligament sections
- Damaged or deformed tube ends at the tube sheet interface
- Scaling or biological fouling obscuring the surface condition
Proactive Inspection Methods
Rather than waiting for symptoms, two testing methods can catch deterioration before a failure occurs:
- Eddy current testing — as defined by ASNT, this electromagnetic NDT method inserts a probe into each tube to detect wall-thickness changes, cracks, and corrosion without removing the tube bundle
- Hydrostatic pressure testing — applies a test pressure (under ASME BPVC Section VIII Division 1 guidelines) to identify leak paths across the tube sheet and tube joints
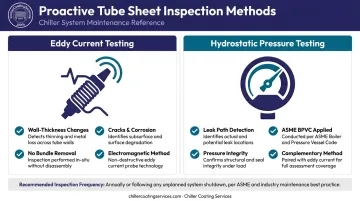
For facilities with aging chiller plants — or those running in corrosive water environments — annual eddy current surveys are worth building into the standard maintenance schedule. Catching wall-thinning or early-stage corrosion at that interval is far cheaper than an unplanned shutdown.
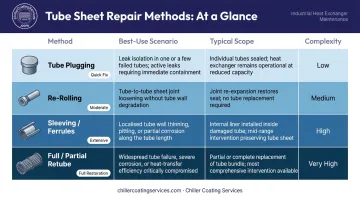
Tube Sheet Repair Methods Explained
Repair options range from targeted quick fixes to complete overhauls. The right choice depends on damage severity, location, and how much of the tube bundle is affected — understanding each method helps you match the repair to the actual problem.
Tube Plugging
Plugging is the fastest, lowest-cost response to an isolated tube failure. Tapered, mechanical, or welded plugs are installed at both ends of a damaged tube, effectively removing it from service.
Key requirements from ASME PCC-2-2022 Article 312-4.2(a): all plugged tubes must be pierced (vented) to allow drainage and prevent plug blowout. Friction-fit tapered plugs are limited to shell-side operating pressures of 1.5 MPa / 200 psi or less.
Tracking plug locations on a "plug map" is a best practice — excessive plugging reduces flow capacity, increases pressure drop, and degrades heat transfer. Once plug count climbs toward TEMA performance thresholds, a partial or full retube becomes necessary.
Re-Rolling and Joint Re-Expansion
When a tube-to-tube sheet joint is leaking but the tube wall itself is undamaged, re-rolling re-expands the tube end within the tube sheet hole to restore the mechanical seal. Per ASME PCC-2, this is appropriate for joints showing small leaks with no apparent damage to seating surfaces.
Re-rolling doesn't address tube wall thinning or cracking. It's specifically a joint-integrity repair.
Sleeving and Ferrules
Sleeves are thin-walled inserts that line the full length of a damaged tube; ferrules target specific damaged sections, typically at the tube ends. Both are expanded into place to restore flow capacity and seal the damaged area.
ASME PCC-2-2022 Article 312-3.3(c) specifically identifies sleeves as the appropriate method for lining damaged regions or restoring thinned tubes. These are typically interim measures — effective for extending service life while a full retube is planned and budgeted.
Full or Partial Retubing
Retubing removes some or all damaged tubes and installs new ones, keeping the original tube sheets and shell. It's the most thorough repair option and is warranted when:
- Plug count has grown to the point where system performance is compromised
- Multiple tubes show widespread wall thinning rather than isolated damage
- ASME PCC-2 triggers a "sharp increase in tube failure numbers"
- Tube life is effectively exhausted
Retubing can be performed on-site or at a specialty shop, depending on equipment size and access constraints.
| Method | Best For | Typical Scope |
|---|---|---|
| Tube Plugging | Isolated single-tube failures | Quick fix; monitor plug count |
| Re-Rolling | Leaking joints, intact tube walls | Joint-integrity restoration only |
| Sleeving / Ferrules | Wall thinning, localized damage | Interim extension of service life |
| Full / Partial Retube | Widespread damage or high plug count | Most comprehensive restoration |
How Protective Coatings Fit Into Tube Sheet Repair
Structural repairs address damage that's already occurred. Protective coatings address the conditions that caused it and prevent recurrence. Applied after re-rolling, plugging, or sleeving — or as part of routine maintenance before damage reaches critical levels — a proper coating system is one of the most cost-effective interventions available.
Surface Preparation: The Non-Negotiable First Step
No coating performs well on a poorly prepared surface. Before any coating application, the tube sheet must be blasted to a white metal finish per NACE No. 1/SSPC-SP 5 — meaning all visible rust, mill scale, oxides, and contaminants are removed down to bare, uniform metal.
Any residual contamination will undermine coating adhesion, no matter how good the coating material is. Surface preparation is not a shortcut step.
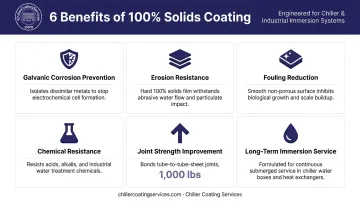
What a 100% Solids Coating System Delivers
A properly formulated 100% solids coating — meaning no solvents or VOCs evaporate during cure, so 100% of the applied material remains as protection — provides multiple simultaneous benefits:
- Galvanic corrosion prevention — creates a non-conductive barrier that electrically isolates dissimilar metals at the tube-to-tube sheet junction
- Erosion and cavitation resistance — protects the tube sheet face against high-velocity flow damage
- Fouling reduction — smooth coating surface limits deposit accumulation, preserving heat transfer efficiency
- Chemical resistance — withstands exposure to oxygenated cooling water and acidic anti-scale treatment chemicals
- Joint strength improvement — properly applied coatings can increase tube-to-tube sheet joint push-out strength by over 1,000 pounds in some cases
- Long-term immersion service — formulated to remain intact in continuous fluid contact
Minimal Downtime and ROI
Quick-cure coating technologies allow return to service in days rather than weeks. The cost of a professional coating application is far less than emergency repairs prompted by a failure event, coolant replacement after contamination, or accelerated equipment retirement.
Chiller Coating Services delivers this through a three-step process: deep cleaning, contained abrasive blasting to white metal finish, and 100% solids coating application. The approach is built to minimize facility disruption for hospitals, schools, office buildings, power plants, and manufacturing facilities across Massachusetts, New Hampshire, Connecticut, Rhode Island, Maine, Vermont, and New York.
Their proprietary coating formulations bond directly to corrosion-prone surfaces, and quick-cure technology gets equipment back online fast — a practical advantage for any facility that can't absorb extended chiller downtime. The management team brings over 40 years of experience in industrial coatings and surface restoration to every project.
Repair vs. Replacement: How to Make the Right Call
The repair-or-replace decision is ultimately an engineering and economics question, not just a maintenance one.
When Repair Is the Right Choice
Repair remains viable when:
- The tube sheet is structurally intact with no through-wall defects
- Corrosion or erosion is surface-level rather than penetrating
- Plug count remains within TEMA performance tolerance
- The system has meaningful remaining service life if properly restored
- Cumulative repair costs are clearly below replacement cost
When Replacement Makes More Sense
Replacement becomes the better option when:
- The tube sheet has through-wall cracks or severe corrosion that compromises structural integrity
- Plug count has pushed the unit below acceptable performance thresholds
- Tube sheet material is no longer compatible with current process conditions
- Cumulative repair costs are approaching or exceeding replacement cost
Get a Professional Assessment First
Neither of those checklists above can be applied accurately without reliable data. Visual inspection alone misses hidden damage — wall thinning, subsurface cracking, joint relaxation. Eddy current testing identifies internal tube degradation and wall loss without cutting into the equipment; hydrostatic testing confirms whether pressure integrity is still intact. Together, they give you documented, evidence-backed justification for whichever path you choose. That data turns a judgment call into a defensible engineering decision — and protects you if that decision is ever questioned.
Frequently Asked Questions
Can you patch a hole in a tube?
Yes — individual tubes can be addressed through plugging (sealing both ends) or sleeving (inserting a thin-walled liner). These are typically considered interim or permanent fixes for isolated tube damage. When tube damage is present, the tube sheet itself should also be inspected and protected, since the same conditions that damaged the tube likely affect the surrounding tube sheet face.
What is a fixed tube sheet?
A fixed tube sheet heat exchanger has tube sheets permanently welded to the shell, so the shell side cannot be mechanically cleaned and tube bundle removal requires cutting the shell. It's a simpler, more economical design than floating head or U-tube configurations, but less accessible for maintenance in aggressive service environments.
What is the 10/13 rule for tube rupture?
The 10/13 rule is a pressure safety guideline from API Standard 521: if tube-side design pressure is less than 10/13ths (approximately 77%) of shell-side design pressure, a tube rupture could over-pressurize the shell side. Engineers sizing relief systems should confirm the current applicable section directly in their edition of API 521.
How do you know when a tube sheet needs repair?
Key indicators include reduced system efficiency or capacity, visible pitting or corrosion on the tube sheet face, unexplained fluid leaks or coolant contamination, and abnormal pressure differentials. Proactive inspection is the better approach — eddy current testing and hydrostatic pressure testing can identify deterioration well before visible symptoms appear.
How long does tube sheet repair typically take?
Tube plugging can be completed in hours; re-rolling and coating applications typically take one to several days depending on scope and cure time. Quick-cure coating technologies reduce total downtime significantly — a meaningful factor for facilities where extended chiller downtime isn't operationally feasible.
What is the difference between tube sheet repair and tube sheet replacement?
Repair — through coatings, plugging, re-rolling, or sleeving — restores a damaged tube sheet to serviceable condition while keeping the original equipment in place. Replacement means fabricating and installing an entirely new tube sheet, and is typically reserved for catastrophic structural failure that repair methods cannot address.